Create an Entity
Introduction
This guide explains how to create entities.
Entities are containers into which (input) data and rules acting on that data can be integrated, as in a JavaScript class. Using entities is the most natural/logical way to implement a business rule in a ruleset, and therefore, they improve the manageability of your rulesets.
Within an entity, data become regular properties and rules calculated properties of the entity, like in this Person entity:
Name(regular property)Address(regular property)DateOfBirth(regular property)Age(calculated property – rule)
Elementary and compound entities
The Person entity is self-contained and therefore a so-called elementary entity. Elementary entities cover many real-world business rule scenarios, but Rulecube goes even further with compound entities that are composed of two or more connected entities to cover all possible business scenarios.
For example, a compound Invoice entity consists of its own properties and properties based on the InvoiceItem entity, where one invoice can have one or more items. Furthermore, the InvoiceItem entity is connected to the ProductItem entity that holds product details:
Invoice (entity):
InvoiceDate
TotalAmount
InvoiceItems -> InvoiceItem (entity):
Count
Amount
Product -> ProductItem (entity):
ProductID
Description
Price
This way, you can cover each data structure you need in your rulesets.
Procedure
Let's create a compound entity because if you master that, you'll also know how to create elementary entities. You'll create the compound Invoice entity as shown above, including the calculation of Amount at the InvoiceItem level and the TotalAmount at the Invoice level.
For compound entities, it's necessary to work bottom-up because parent entities require child entities to be available. So, first, create ProductItem, then InvoiceItem, and finally, Invoice:
Step 1: Create the ProductItem entity
ProductItem entityCreate a ruleset named
TotalInvoiceAmount.Create an entity named
entProductItem.Click Add property. ↳ The Input/Property page opens.
In The Name field, enter
ProductID. And in the Type list, selectstring.Save the property.
Repeat steps 3 to 5 to create the
Descriptionproperty as astringand thePriceproperty as anumber. ↳ Finally, your entity should look like this:
Step 2: Create the InvoiceItem entity
InvoiceItem entityCreate an entity named
entInvoiceItem.Add a property named
Count(Type=number).Add a property named Product. And in the Type list, select
entProductItem. ↳ Now,entInvoiceItemandentProductItemare connected, andentInvoiceItemhas become a compound entity. Rulecube shows this with a little cube icon in front of theentInvoiceItementity:
Add a calculated property for
Amount(Type=number) and set its Expression to:Explanation Because
entInvoiceItemandentProductItemare connected, you can use theProduct.Priceto calculate the amount for invoice items.Save the entity. ↳ The content of
entInvoiceItemshould look like this:
Notice that Rulecube places the
 of input in front of regular properties and the
  of rule in front of calculated properties.
Step 3: Create the Invoice entity
Invoice entityCreate an entity named
entInvoice.Add a property named
InvoiceItemsand set its Type toarraywith Sub type =entInvoiceItem. ↳ By defining this property as an array, an invoice can have multiple items. Furthermore,entInvoiceandentInvoiceItemare connected now. And becauseentInvoiceItemis connected toentProductItem,entInvoiceis also connected toentProductItem.Add a calculated property for
TotalAmount(Type=number) and set its Expression to:Explanation This is an arrow function that summarizes all the item amounts into the
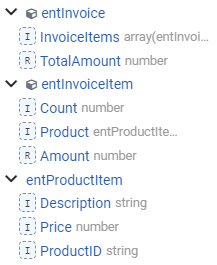
TotalAmount.Save the entity. ↳ Your compound entity structure now should look like this:

Step 4: Test your ruleset
Try out the ruleset and enter input like this:
After executing, you should get a result like this:
With the amount calculated per item and the total amount calculated for the invoice.
Additional resources
If you have a JSON schema or an XSD for your entity structure, Rulecube has a much easier and quicker way to create entities as described in the Drag and Drop guide.