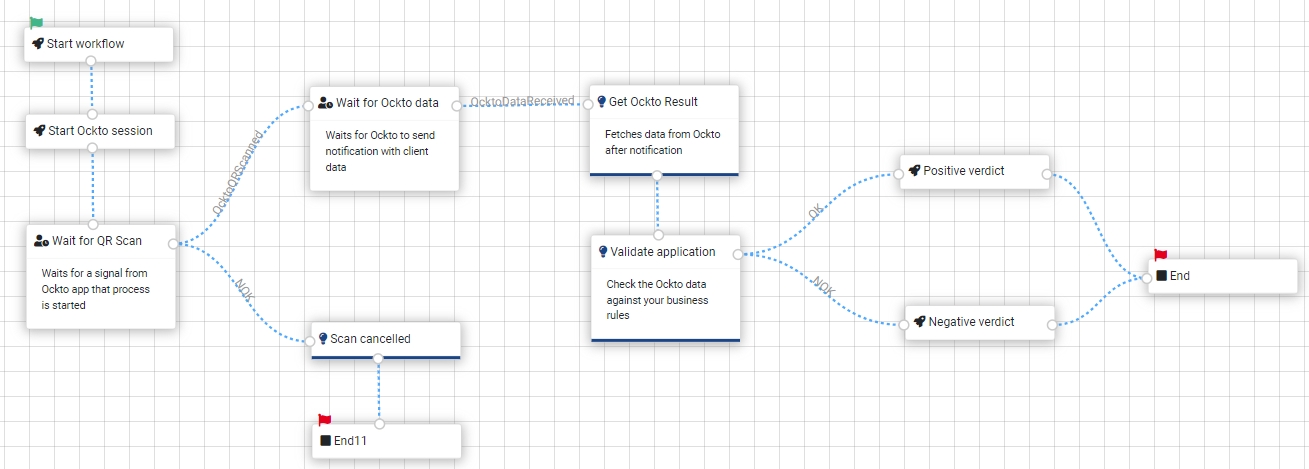
In this chapter, we will guide you through the setup of an Ockto workflow. In this workflow, we will:
Start an Ockto session
Check the availability of the needed data sources
Wait for an end user to scan the Ocko QR code
Proceed the workflow to wait for the availability of the Ockto data from the end user process
Get the Ockto data
Handle the data using business rules
Ultimately, we will create a workflow that can be reused as a template for all kinds of processes with Ockto as a basis.
System prerequisites:
Ockto should be enabled on the Rulecube instance as part of your Rulecube license
You already have set up all the Ockto settings you need in your Tenant:
Username
Password
Provider code
Endpoint (staging or production)
Certificate
Go to the workflow canvas. You will see a Start step in the workflow.
Entity name: OcktoSession
Input properties:
sessionId: string
qrCode: string
Add an input to the State Entity:
name: ockto
type: ocktoSession
Drag an Action step on the workflow canvas. Give it a name, e.g. 'Start Ockto session'. Drag a line between the Start step and your new action. In this action, type the following code:
In the code above, we call Ockto and wait for a session to be started. This call results in both a session ID and a QR code. We save those in the workflow state.
Use the right settings for your specific process. See the documentation and the Ockto support portal for a description of all the options.
Normally, you will have a front-end application handling the customer process. In that front end, you would now show the Ockto QR code. The customer can open their Ockto app and start gathering their personal data from there.
This guide only uses the workflow debugging feature (the Sandbox). To show the QR code in the Sandbox, you can use Rulecube's logging feature. Add the following javascript code to the action above:
Three things can happen: the customer scans the QR code and starts gathering their information, the customer doesn't scan the QR code, or the customer cancels the process.
Add a Wait step to the workflow canvas. Give it a name, e.g. "Wait for QR scan".
Add two branches to this step:
NOK: this branch will be chosen when the user cancels the process
OcktoQRScanned: this branch will be chosen when the user scans the QR code
Add an End step to the workflow canvas and connect the NOK branch to the End step.
Add a Wait step to the workflow canvas. Give it a name, e.g. "Wait for Ockto data".
Add the OcktoQRScanned branch to this step.
Add an Action step to the workflow canvas. Give it a name, e.g. "Get Ockto result".
Add a branch between the "Wait for Ockto data" step and the "Get Ockto result" step and give it the name "OcktoDataReceived".
Add the following code to the action:
The result variable now contains all of your customer's Ockto data.
If you save this ruleset and start it from the Sandbox, you can try it out for yourself!
